You sit down for breakfast, and the chair shifts beneath you. You wiggle. It wobbles. You add another book under the leg and forget about it — until it happens again.
Sound familiar? A wobbly chair is one of the most common and most ignored household problems. But here’s the thing: it almost always has a simple fix, and you don’t need to be a carpenter to solve it.
This guide walks you through every method about how to fix a wobbly chair— from a quick 5-minute tighten to a full joint re-glue — so your chair feels rock-solid again.
Why Do Chairs Become Wobbly?
Before you grab a screwdriver, it helps to understand why chairs wobble. The cause usually points directly to the solution.
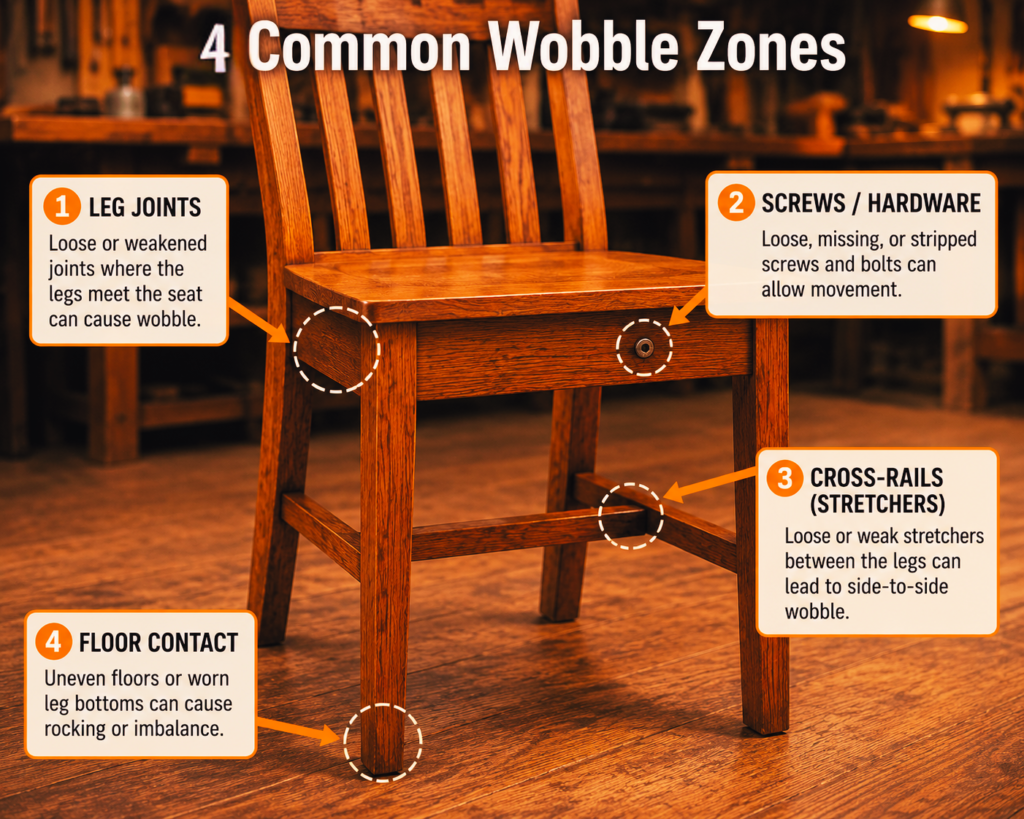
Chairs take more mechanical stress than almost any other piece of furniture. Every time someone sits down, stands up, or rocks back, force travels through the joints and legs. Over time, that stress adds up.
Here are the most common culprits:
- Loose screws or bolts — Normal use causes fasteners to back out gradually. Even one loose screw can make the whole chair feel unstable.
- Failed wood glue — Glue bonds weaken with age, humidity changes, and repeated stress. This is the most common cause in older wooden chairs.
- Stripped screw holes — If a screw spins freely without tightening, the wood fibers around it have been worn away.
- Uneven legs — One leg is shorter than the others, or the floor is uneven. The chair rocks because it can’t find a stable four-point contact.
- Cracked wood — Hairline splits near joints can allow flexing that mimics a loose joint.
According to West Dean College of Arts and Conservation, the most common structural failure in wooden chairs is glue degradation at the mortise-and-tenon joints — the points where the legs connect to the seat frame.
Knowing which of these applies to your chair makes the repair faster and more effective. Let’s diagnose it first.
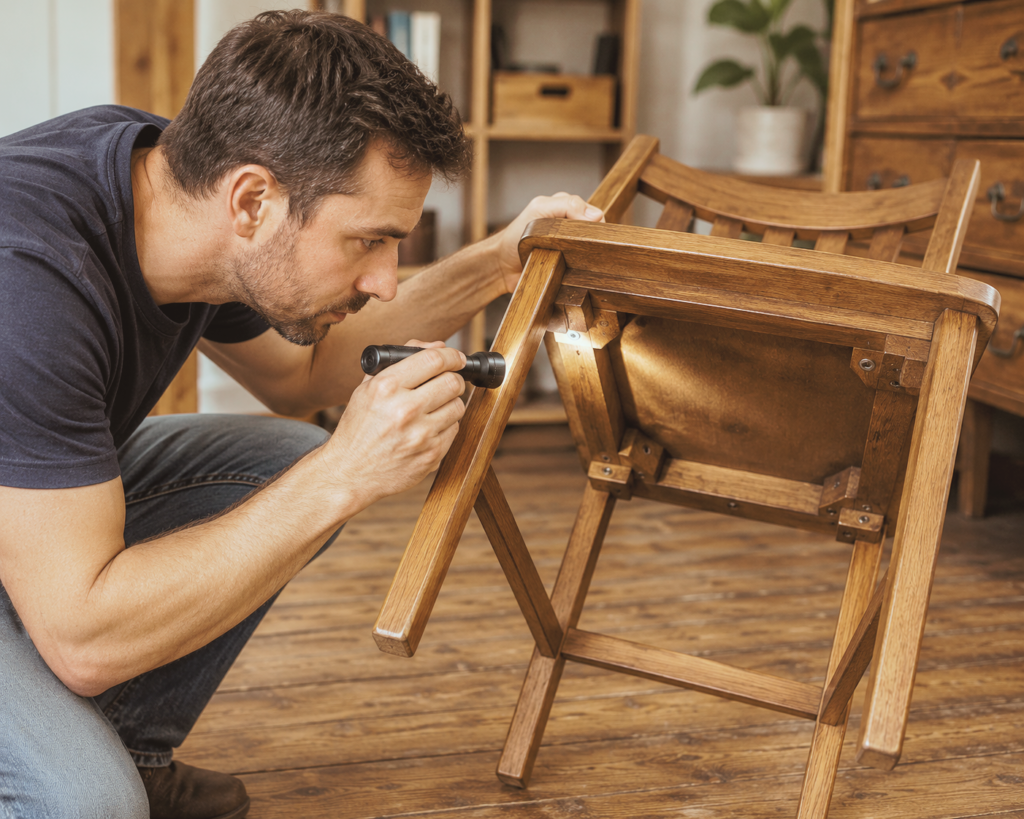
How to Diagnose a Wobbly Chair (Before You Fix It)
Don’t skip the diagnosis. Applying glue when the real problem is a stripped screw, or vice versa, wastes time and can make the repair harder later.
The Wobble Test
Set the chair on a flat, hard floor. Sit in it gently and rock in each direction — forward, backward, left, and right. Notice where the movement seems to originate. Is it one leg lifting? Is the back frame twisting? Does it wobble more when you push on one side?
The Flip-and-Check Inspection
Flip the chair upside down. Now check:
- Every visible screw or bolt — Try tightening each one by hand. If any turn easily, that’s your first fix.
- All leg joints — Grip each leg and try to wiggle it independently. If it moves at the joint, the glue has failed.
- Leg tips — Look for worn or missing rubber or felt pads. One missing pad can create a slight leg-length difference.
- The wood itself — Use a flashlight to look for hairline cracks, especially near joint ends and knots.
As furniture expert Nolen Mares, director of operations at SouthLoft, advises in this expert repair roundup: always flip the chair first and check all visible hardware before assuming the problem is structural.
Also Read: How to Clean Shower Tiles- 6 Steps
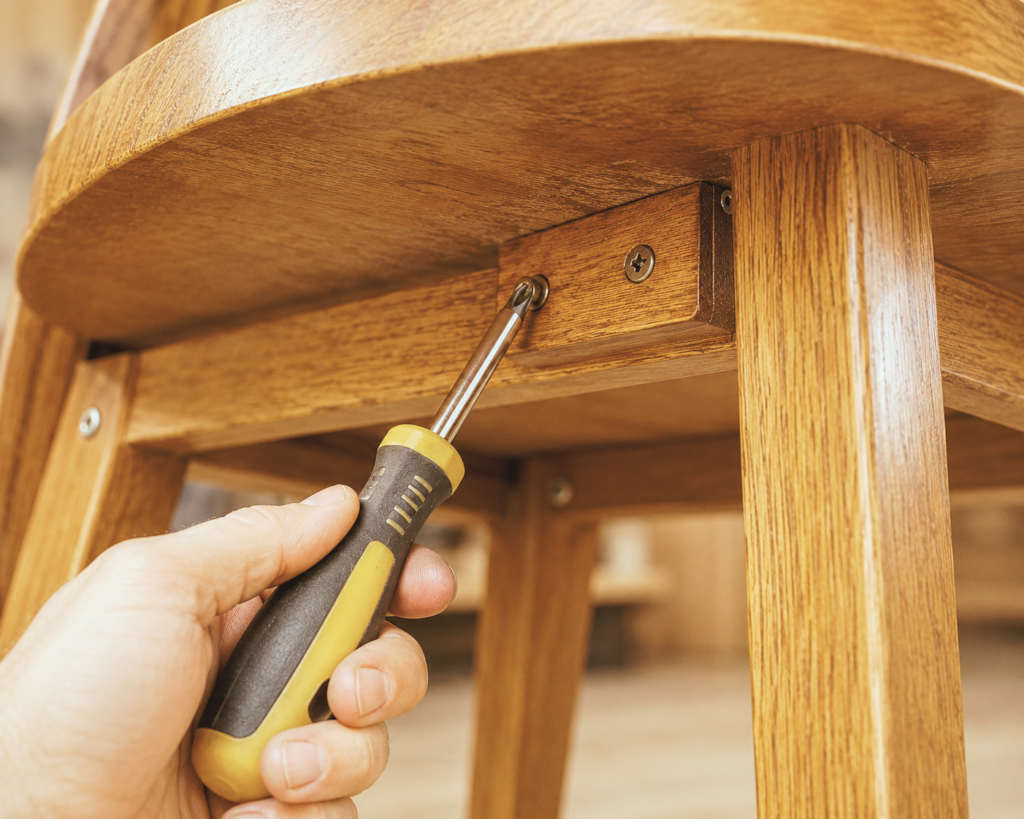
Method 1 — Tighten Loose Screws and Hardware
This is always step one. It’s fast, costs nothing, and solves the problem more often than you’d expect.
What you’ll need:
- Screwdriver (Phillips or flathead, depending on your screws)
- Wrench or Allen key (for bolt-style hardware)
Steps:
- Flip the chair upside down on a padded surface (a towel works great).
- Locate every screw, bolt, or bracket on the underside.
- Tighten each one gradually and evenly — don’t crank one side fully before touching the other.
- Be careful not to overtighten. As Mares warns, overtightening can strip the screw holes or crack the wood.
- Flip the chair back and test it.
If the screws tighten but the wobble returns within days, the screw holes are likely stripped. Move to Method 2.
Method 2 — Fix Stripped Screw Holes
A stripped screw hole is one where the wood fibers have worn down so much that a screw can’t grip. The screw goes in but just spins uselessly.
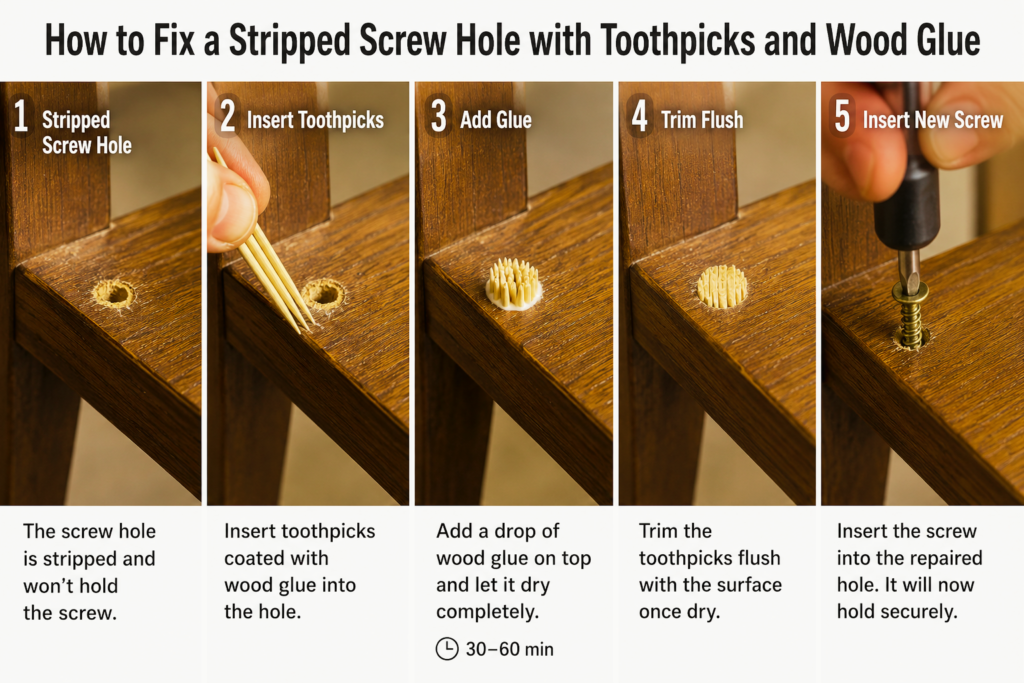
The fix is simple: you’re essentially rebuilding the hole so the screw has something to grip again.
What you’ll need:
- Wooden toothpicks or a small wooden dowel
- Wood glue (PVA or similar)
- A utility knife or sandpaper
Steps:
- Remove the loose screw completely.
- Coat two or three wooden toothpicks in wood glue.
- Pack them firmly into the stripped hole.
- Snap or trim off the excess flush with the surface.
- Let it cure for at least an hour (ideally overnight).
- Reinstall the original screw — it’ll have fresh wood fiber to bite into.
Richard Louise, owner of Dovetails and Stitches furniture repair shop, recommends this exact method in this expert repair guide, noting that it creates a clean, fresh anchor without requiring any special tools.
For larger holes, a small wooden dowel coated in glue works even better than toothpicks.
Method 3 — Re-Glue Loose Chair Joints
This is the most effective long-term fix for chairs where the wobble comes from a joint — where a leg connects to the seat frame or where cross-rails (stretchers) connect legs to each other.
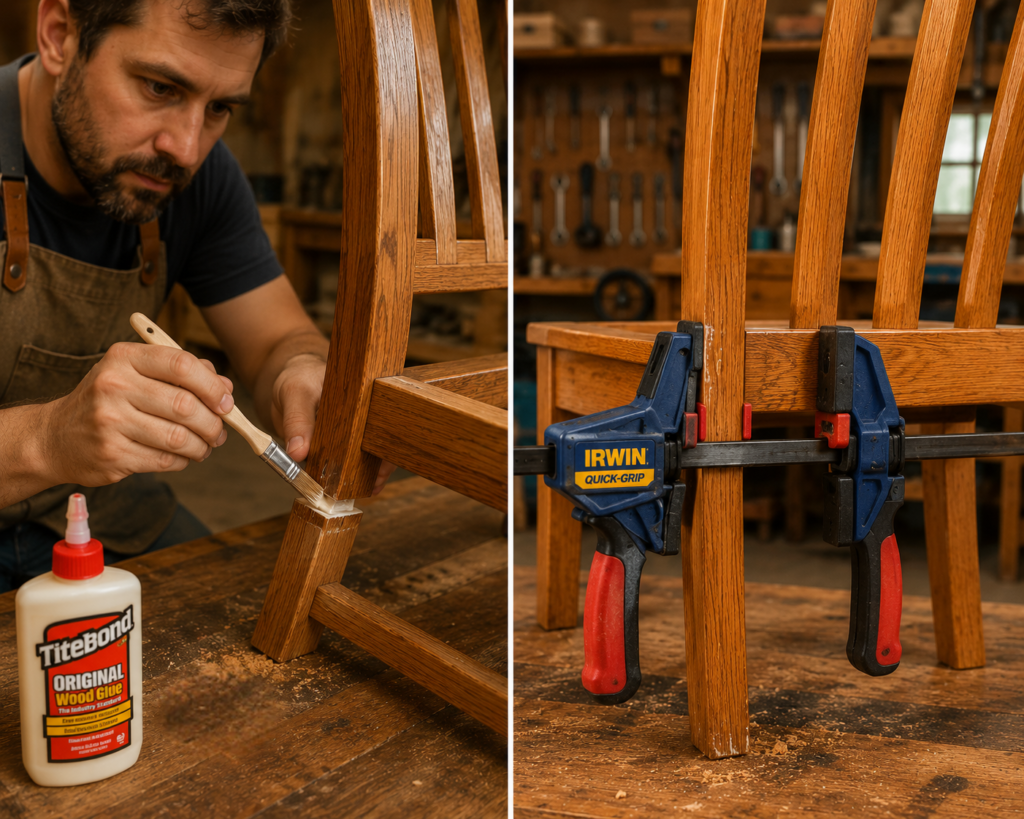
Quick Fix — Glue Injection (Without Disassembly)
If only one joint is loose and the rest of the chair is solid, you may be able to inject glue without taking the chair apart.
- Gently flex the joint to open the gap slightly.
- Use a syringe-style glue applicator or a thin-nozzle bottle to work glue into the gap.
- Clamp the joint shut, or wrap a ratchet strap around the chair legs to apply even pressure.
- Wipe off any squeeze-out with a damp cloth immediately.
- Let cure for 24 hours before use.
iFixit’s wooden chair repair guide recommends this injection method for minor joint separation where full disassembly would risk disturbing otherwise stable joints.
Full Re-Glue — Disassembly Method
When multiple joints have failed, or when you want a permanent repair, the complete disassembly and re-glue method is the gold standard.
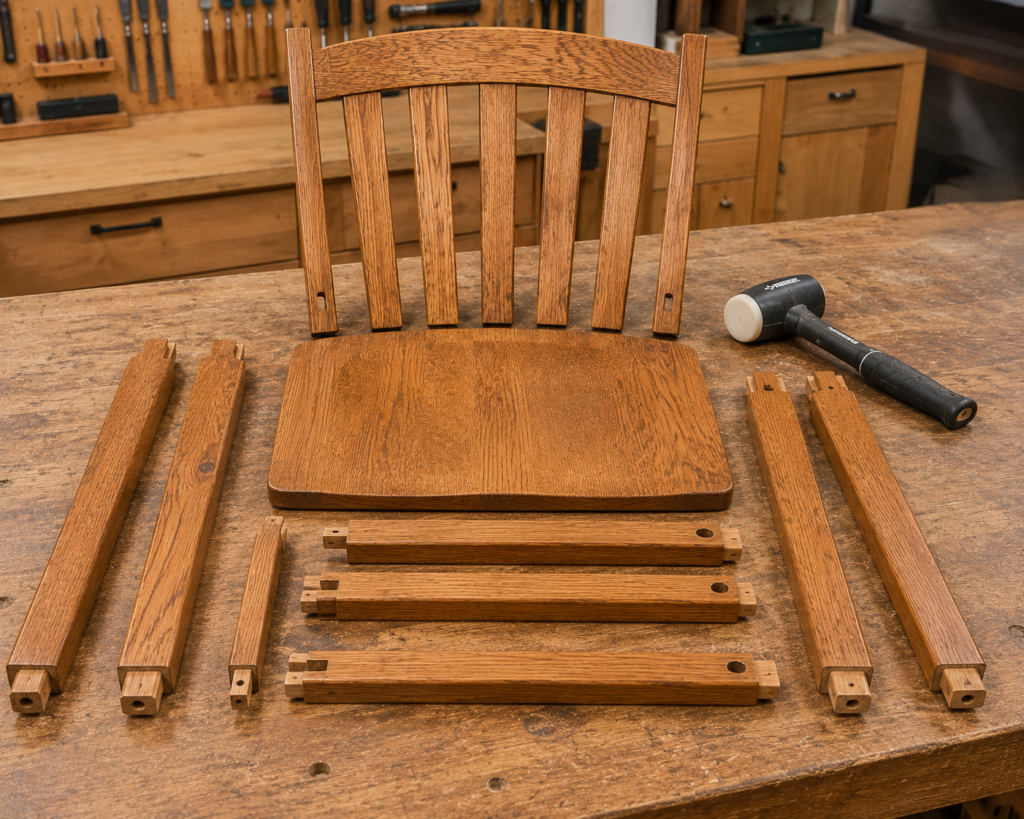
According to Family Handyman, this is the most reliable method for chairs where the original glue bond has deteriorated across multiple joints.
What you’ll need:
- Deadblow or rubber mallet
- Chisel or sandpaper (for removing old glue)
- Wood glue (see glue selection guide below)
- Bar clamps or ratchet straps
- Damp cloth
Steps:
- Disassemble the chair — Strike firmly near each joint with a deadblow mallet to break the old glue bond. Work section by section.
- Remove all old glue — Scrape or sand every joint surface clean. Old glue prevents new glue from bonding to the wood properly.
- Dry-fit everything — Reassemble without glue first to make sure every piece fits correctly.
- Apply fresh glue — Coat both mating surfaces of each joint with a thin, even layer of wood glue. Work quickly — most wood glues begin setting within 5–10 minutes.
- Reassemble and clamp — Put everything back together and clamp all joints simultaneously. Use bar clamps for maximum pressure, and wrap a ratchet strap around the chair for overall compression.
- Wipe squeeze-out — Use a damp cloth to clean up any glue that oozes from the joints.
- Let it cure fully — Place the chair on a flat surface with weight on the seat and don’t use it for at least 24 hours.
Choosing the Right Wood Glue for Chair Repair
Not all wood glues perform equally under the lateral and racking forces that chairs experience daily. This is one area where the wrong choice can mean the joint fails again within months.
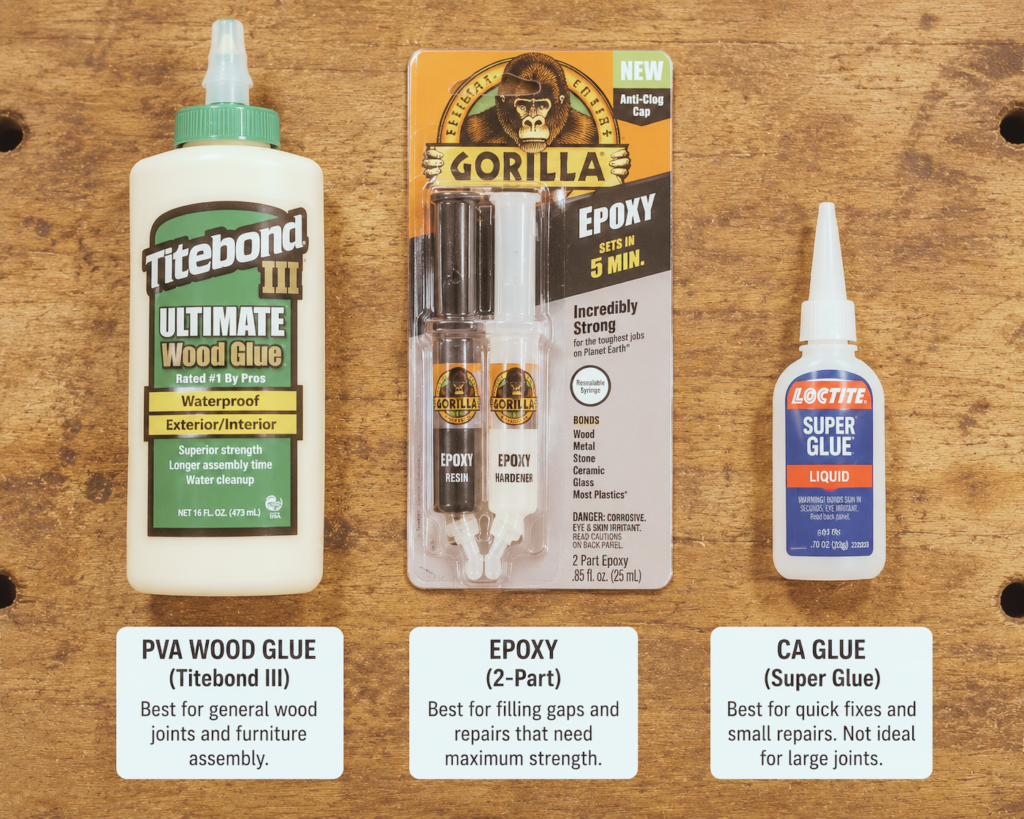
Here’s a quick comparison based on guidance from Rockler Woodworking and Bob Vila’s wood glue testing:
| Glue Type | Best For | Open Time | Gap-Filling | Water Resistance |
|---|---|---|---|---|
| PVA (Titebond II/III) | Clean, well-fitting joints | 5–10 min | Minimal | Moderate–High |
| Two-Part Epoxy | Loose-fitting or gapped joints | 15–30 min | Excellent | Excellent |
| Hide Glue | Antique or heirloom chairs | 5–10 min | Minimal | Low |
| CA (Super Glue) | Minor, quick surface repairs | Seconds | Minimal | Low |
Expert recommendation: For most household chair repairs, Titebond III is the go-to choice — it creates bonds stronger than the wood itself when joints fit well, and it’s easy to clean up with water while wet. For joints that are loose-fitting or gapped, two-part slow-set epoxy provides superior gap-filling strength with some flexibility that resists racking forces.
As woodworking experts on Fine Woodworking point out, the best repair adhesive for chairs needs to withstand shear and tensile forces simultaneously — which rules out basic white school glue or superglue as long-term solutions.
Expert Tip: Always clamp joints at the right pressure. According to Engineer Fix, hardwoods need 175–250 psi of clamping pressure, while softwoods need 60–100 psi. Too little pressure = weak bond. Too much = glue starved from the joint.
Method 4 — Level Uneven Chair Legs
Sometimes there’s nothing wrong with the joints or hardware. The chair wobbles because one leg is slightly shorter — or the floor isn’t perfectly flat. This is especially common with older chairs where legs have worn unevenly.
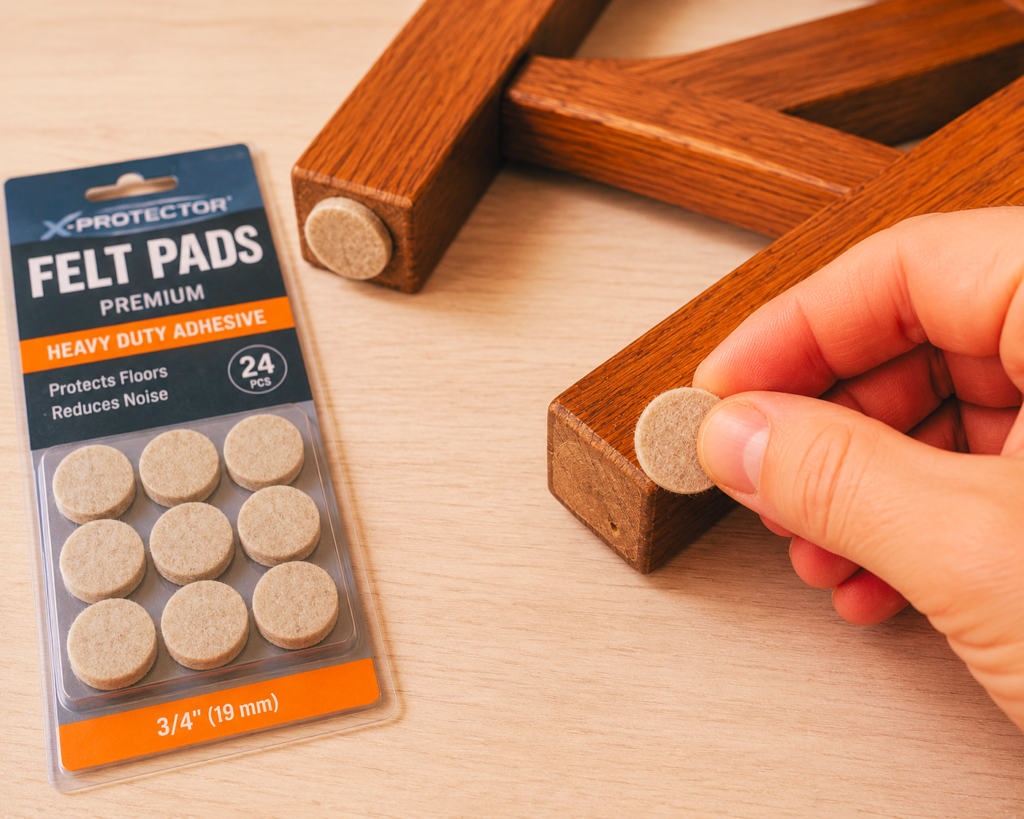
Quick Fix — Furniture Pads or Glides
Stick-on felt pads or rubber furniture glides can solve minor leg-length discrepancies instantly. Add them to the shorter leg(s) until the chair sits flat. This is a temporary fix, but it’s great for floors that are slightly uneven.
As furniture experts advise in this repair guide, felt-bottom levelers work best on hardwood or tile floors, while metal glide levelers are better suited to carpeted surfaces.
Permanent Fix — Trim the Short Leg(s)
If one or more legs are genuinely longer than the others, you can trim them down — but this requires care, since once wood is removed, it can’t go back.
- Place the chair on a perfectly flat surface.
- Identify the offending leg(s) using a straightedge or level.
- Mark the amount to remove with a pencil.
- Use a hand saw, miter saw, or even a belt sander to carefully remove material in tiny increments.
- Re-check on the flat surface between each pass.
Only attempt this if you’re comfortable with power tools and have measured carefully.
Method 5 — Add Corner Brackets for Extra Reinforcement
When a chair has been repaired multiple times, or when the joints are simply too worn for glue alone, metal L-brackets (corner brackets) provide additional structural reinforcement.
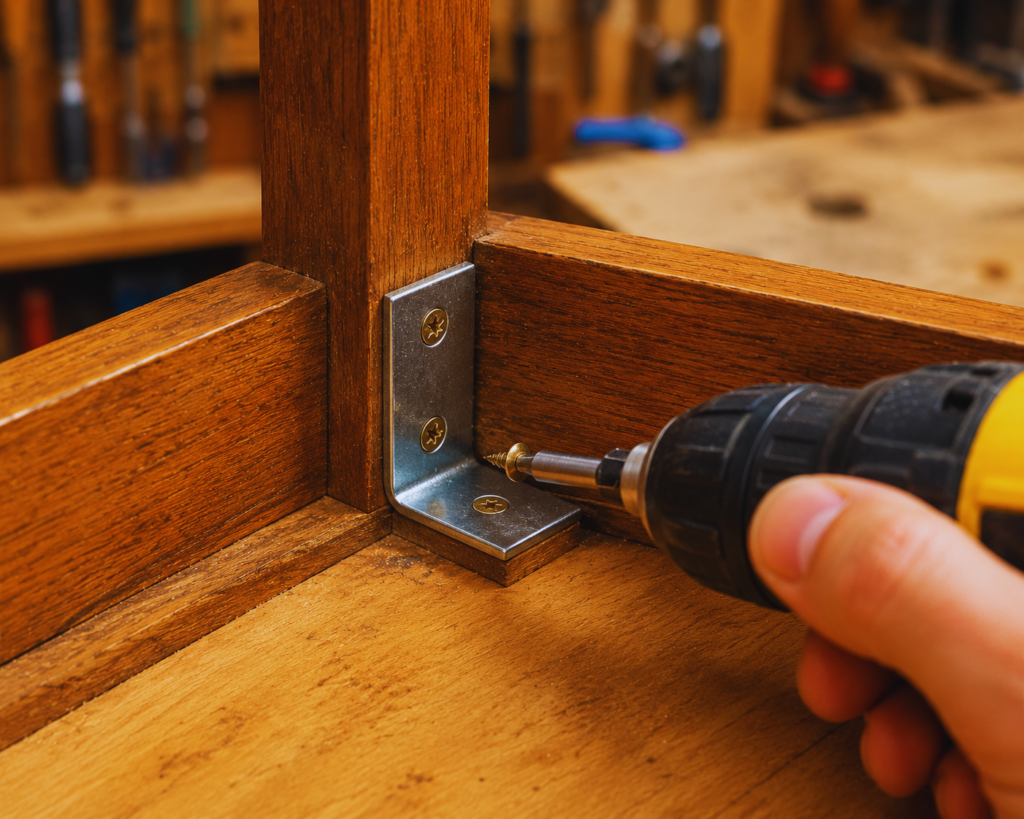
This method works especially well on chairs with flat-panel seat frames, such as dining chairs or simple wooden side chairs.
- Tighten any existing hardware and allow any fresh glue to cure first.
- Position a small corner bracket inside the angle where the leg meets the seat frame.
- Mark and pre-drill pilot holes to avoid splitting the wood.
- Screw the bracket firmly into place.
- Repeat on any other weak corners as needed.
iFixit’s repair guide walks through this exact approach step-by-step and recommends it as a way to add mechanical strength even after gluing.
Expert Tips to Keep Your Chair from Wobbling Again
Fixing a wobbly chair is satisfying. Preventing it from happening again is even better. Here are some professional maintenance habits that make a real difference:
- Never drag chairs across the floor. Dragging applies shear force directly to leg joints, rapidly weakening the glue bond. Lift chairs when moving them.
- Inspect screws seasonally. Do a quick tighten-check twice a year — once in spring and once in fall. Catching a loose screw early prevents joint failure.
- Control indoor humidity. Wood expands and contracts with humidity changes, which stresses glue bonds over time. A home relative humidity of 35–55% (easily maintained with a basic humidifier or dehumidifier) is ideal for wood furniture, according to the Wood Database.
- Don’t lean back on two legs. This applies hundreds of pounds of racking force to the rear joints — the most common cause of premature joint failure in dining chairs.
- Use felt pads on all legs. They protect the floor and provide even, shock-absorbing contact.
When to Repair vs. Replace
Not every wobbly chair is worth fixing — and knowing when to let go saves time and money.
Repair is worth it when:
- The chair has sentimental or antique value
- The structure is fundamentally sound (just a joint or screw issue)
- The repair cost in materials is well below replacement cost
- You enjoy DIY and have the tools already
Consider replacing when:
- Multiple legs or structural members are cracked or broken
- The frame has been repaired several times and keeps failing
- The chair is low-quality flat-pack furniture where joints can’t be properly re-glued
- Replacement parts are unavailable and damage is extensive
As noted by homekitdecor.com, if a chair has sentimental value or is well-made, fixing it is almost always worth it — the materials cost very little and the repair usually takes under an hour.
FAQs — How to Fix a Wobbly Chair
Can I use super glue to fix a wobbly chair joint?
Super glue (cyanoacrylate) can work for very small surface repairs, but it creates a rigid, brittle bond that doesn’t hold up well to the racking and shear forces chairs experience daily. For structural joint repairs, PVA wood glue (like Titebond II or III) or two-part epoxy is a much more durable choice.
How long does wood glue need to cure before I can use the chair?
Most PVA wood glues reach handling strength within 30–60 minutes, but the joint needs a full 24 hours to cure completely before the chair can bear weight safely. Rushing this step is one of the most common reasons repairs fail quickly.
My chair keeps wobbling even after I tighten the screws — what’s wrong?
If tightening doesn’t solve the problem, the screw holes are likely stripped, or the joints themselves have failed. Check whether any screws spin freely without tightening (stripped hole) or whether you can wiggle individual legs at the joint (failed glue bond). Both are fixable using the methods in this guide.
Is a wobbly chair dangerous?
Yes — a wobbling chair can unexpectedly tip or collapse under load, especially when someone stands on it or shifts their weight suddenly. It’s always best to fix the problem before continued use. Chairs that feel unstable during normal sitting should be taken out of service until repaired.
What’s the best way to fix a wobbly office chair?
Office chairs typically wobble due to loose bolts at the base, a worn gas cylinder, or a cracked caster hub rather than wood joint failure. Start by flipping the chair and tightening the base bolts with a wrench. If the chair sinks or the height won’t hold, the gas cylinder likely needs replacement — a part available inexpensively from most office furniture retailers or on Amazon.
Conclusion
A wobbly chair doesn’t have to mean a trip to the furniture store. In most cases, the fix takes less than an hour, costs just a few dollars in materials, and produces a chair that will stay solid for years.
Start with the simplest approach — tighten the screws. If that doesn’t hold, move to fixing stripped holes, re-gluing joints, or leveling the legs. Add corner brackets for extra reinforcement if needed.
The key is diagnosing the actual cause before reaching for any tools. Once you know what’s making the chair wobble, the solution usually becomes obvious.
Ready to get started? Grab a screwdriver, flip the chair over, and spend 10 minutes checking every screw and joint. You’ll likely have the problem solved before the coffee gets cold.